Explore the blog
Tag:Die Cutting
Posts mit dem Label Die Cutting werden angezeigt. Alle Posts anzeigen
Donnerstag, 29. Oktober 2020

  - Werbung/Ad -
*Affiliate Links Used

Hi and welcome back!

Today I'm sharing a new card with products from Penguin Palace!


My card features the new Hello Sunshine Stencils 360° TM!


First I die cut my 4 1/4" x 5 1/2" card panel with the Cross Stitched and Dots Large Rectangles Overlays.
Then I picked up the Barrel 1. I ink blended Peacock Feathers Distress Ink with a turning interval of 15 °. In a second round I created my own turning interval and ink blended Seedless Preserves Distress Ink.


Next, I die cut a circle with the circular die from Words From The Heart (Chapters 1&2) Coordinating Penguin Perfect Cuts. I then die cut the Never Lose Hope Shadow sentiment. I inked the heart of the die cut sentiment with Versamarker and embossed it with silver embossing powder.


To finish off, I assembled my card using foam tape to create dimension.


I hope you like my card!

Thanks for stopping by and happy crafting!

Anja
If you like this post, be sure to follow my blog! (Buttons are in the sidebar on the right.) 
Donnerstag, 15. Oktober 2020

                                                                                         - Werbung/Ad -

*Affiliate Links Used

Hi and welcome back!

Today I'm sharing a new card with products from Penguin Palace!


My card features the new Floral Wreath Stencils 360° TM!

First I die cut my 4 1/4" x 5 1/2" card panel with the Dots Meet Dashes Large Rectangles Overlays.
Then I picked up the Single Barrel TM. I used a turning interval of 45° and blended a combination of Mowed Lawn, Bundled Sage, Dried Marigold, Worn Lipstick and Speckled Egg Distress Oxide inks onto my card panel.


Then I stamped a sentiment from Words From The Heart (Chapter 2) using Mowed Lawn and Dried Marigold Distress Oxide inks. This sentiment was then die cut using a circular die from Words From The Heart (Chapters 1&2) Coordinating Penguin Perfect Cuts.

Next I die cut another piece using matching cardstock with the hexagon die from Words From The Heart (Chapters 1&2) Coordinating Penguin Perfect Cuts.


To finish off, I assembled my card using liquid glue. I adhered the sentiment with foam tape to create dimension.


I hope you like my card!

Thanks for stopping by and happy crafting!

Anja
If you like this post, be sure to follow my blog! (Buttons are in the sidebar on the right.) 
Donnerstag, 25. Juni 2020
Hi there!

Today I'm sharing a cute card that I made using The Sweetest Truck from Penguin Palace


I began this card by die cutting two card panels with the Dots Meet Dashes Large Rectangles Overlays dies. With the larger die I cut an A2 sized panel with pattern paper and with the smaller die I cut white cardstock.


Next, I took a heart die and cut masking paper with it. I put the negative of the die cut onto my white panel. Then, I stamped out many little images from The Sweetest Truck to fill this heart. I colored them in with my Copic Sketch markers. I also stamped the little girl and a donut and cut them out with the coordinating Penguin Perfect Cuts. After coloring the little girl, I added highlights with a white gel pen.


I chose a sentiment from the Rabbit Cafe, which goes so well with my card!

To finish off, I assembled my card and adhered the little girl with foam tape.


That's it!

I hope you like my card!

Thanks for stopping by and happy crafting!

Anja
If you like this post, be sure to follow my blog! (Buttons are in the sidebar on the right.) 
Donnerstag, 21. Mai 2020
- Werbung - 
Hi there!

Today I'm sharing a new card featuring stamps and dies from Penguin Palace.
I used the Classic Diamonds Backdrop stand-alone die and the There's No One Like You stamp set & coordinating Penguin Perfect Cuts. I also used the large Dots Meet Dashes Rectangles and the small Dots Meet Dashes Rectangles.
Here is a look at my card:


First I die cut white cardstock with the Classic Diamonds Backdrop die and then, die cut this portion again with the large Dots Meet Dashes die. With one of the small Dots Meet Dashes Rectangles die I die cut white cardstock twice.


Next, I stamped out the images on Neenah cardstock, colored them in with my Copics and cut them out with the coordinating Penguin Perfect Cuts. I stamped the tray again, but this time on pattern paper because I wanted to do paper piercing with it. I fuzzy cut the inside of the tray and glued it to the other tray which I stamped on Neenah cardstock. I stamped the steam for the tea with VersaMark on vellum and embossed it with white embossing powder.


The next step was the ink blending and smooching on the two die cut pieces. For one of the two pieces I used brown Harmony Ink from Spectrum Noir and for the other I used picked raspberry and worn lipstick Distress Oxide inks.


Then, I adhered the stamped images with foam tape to the pink background and stamped the sentiment with Versafine.

To finish off, I cut an A2 sized card base and glued the Diamonds Backdrop onto this card base. I adhered the two inked panels with liquid glue.


I hope you like my card!

Thanks for stopping by and happy crafting!

Anja
If you like this post, be sure to follow my blog! (Buttons are in the sidebar on the right.) 
Donnerstag, 7. Mai 2020
- Werbung - 
Hi there!

Today I'm sharing a new encouragement card featuring stamps and dies from Penguin Palace.
I used the Classic Diamonds Backdrop stand-alone die and the My BFF stamp set. I also used the large Dots Meet Dashes Rectangles and the small Dots Meet Dashes Rectangles.
Here is a look at my card:


First I die cut white cardstock with the Classic Diamonds Backdrop die and then, die cut this portion again with the large Dots Meet Dashes die.


Next I die cut watercolor paper with one of the small Dots Meet Dashes dies and stamped the rainbow and the little butterfly from the BFF stamps with VersaMark. I embossed them with white embossing powder. The rainbow is perfect to encourage someone in these times.


Then I colored them in with Zig Clean Color Real Brush Marker. That took more time than I thought because of the little images. I also colored the area between the stamped images with a light yellow Zig marker.


Next I die cut the word "hope" with some alpha dies. I die cut each letter three times and glued them together to create more dimension.


I cut an A2 sized card base and glued the Diamonds Backdrop onto this card base. Then I adhered the word "hope" and applied a piece of yarn. Then I adhered this panel with foam tape.


I hope you like my card!

Thanks for stopping by and happy crafting!

Anja
If you like this post, be sure to follow my blog! (Buttons are in the sidebar on the right.) 
Donnerstag, 9. April 2020
- Werbung - 
Hi there!

I'm back with a new card with Penguin PalaceMy card features the new background die called Classic Diamonds and My BFF stamps and coordinating Penguin Perfect Cuts.


First I die cut white cardstock with the Classic Diamonds die. This die cuts a beautiful diamond pattern and an A2 sized panel at the same time. I love this! Next, I cut an A2 sized card base and ink blended mustard seed, picked raspberry and peacock feathers Distress Inks over it. I left the bottom part of the card base white.


Then, I stamped out the images from the My BFF set on Neenah cardstock and die cut them with the coordination dies. I colored them in with my Copics.


I cut green patternpaper and die cut it with a grassy border die. Next, I stamped my sentiment onto this portion.


To finish off, I assembled my card and glued all my images with liquid glue onto the card.


I hope you like my card!

Thanks for stopping by and happy crafting!

Anja
If you like this post, be sure to follow my blog! (Buttons are in the sidebar on the right.) 
Donnerstag, 2. April 2020
- Werbung -

Hi and welcome to Penguin Palace's New Release & Inspirational Chapter Day 4!

Today we are sharing projects with the stand-alone dies "Dots Meet Dashes Small Rectangle Overlays" and "Dots Meet Dashes Large Rectangle Overlays". I love them so much! They are so unique and a must-have!


I made a simple card to accent the stand-alone dies.

I started by die cutting my card layers and used 3 different dies from the 2 sets. For the largest layer I chose pattern paper, for the second layer white cardstock and for the third layer white cardstock which I ink blended with scattered straw and squeezed lemonade Distress Oxide Ink.


Next, I stamped out images from the new "My BFF" stamps and cut them out with the coordinating Penguin Perfect Cuts. I colored them in with my Copics.


I assembled my card and stamped the sentiment with Versafine ink.


Be sure to check the Penguin Palace blog for a huge giveaway and to see the projects of the other DT members too!


We will see you tomorrow with another new products of this new release!

Thanks for stopping by and happy crafting!

Anja
If you like this post, be sure to follow my blog! (Buttons are in the sidebar on the right.) 
Dienstag, 31. März 2020
- Werbung - 
Hi, everyone!

Today we are sharing projects with another 2 new stamp sets and coordinating Penguin Perfect Cuts!

The first card is featuring the new "There's No One Like You" stamps and dies! This set includes so many funny images and you have so many possibilities creating a card with them! I'm a huge coffee lover and therefore I made a friendship card with a Cappuccino.


I started by stamping out the cute images and colored them in with my Copics. I die cut them with the coordinating Penguin Perfect Cuts.

Next, I cut white cardstock to size for my card base and die cut kraft cardstock or the card panel. I cut one more layer: white cardstock for my stamped background. For this background I took the coffee beans and stamped them across the paper using a brown ink pad.
Since the background seemed too strong to me, I put a layer of vellum on top.


Then I adhered the cute images with foam tape. I stamped the sentiment with VersaMark on a strip of paper and embossed it with white embossing powder.

After assembling my card, I chose some sequins and glued them onto the vellum.


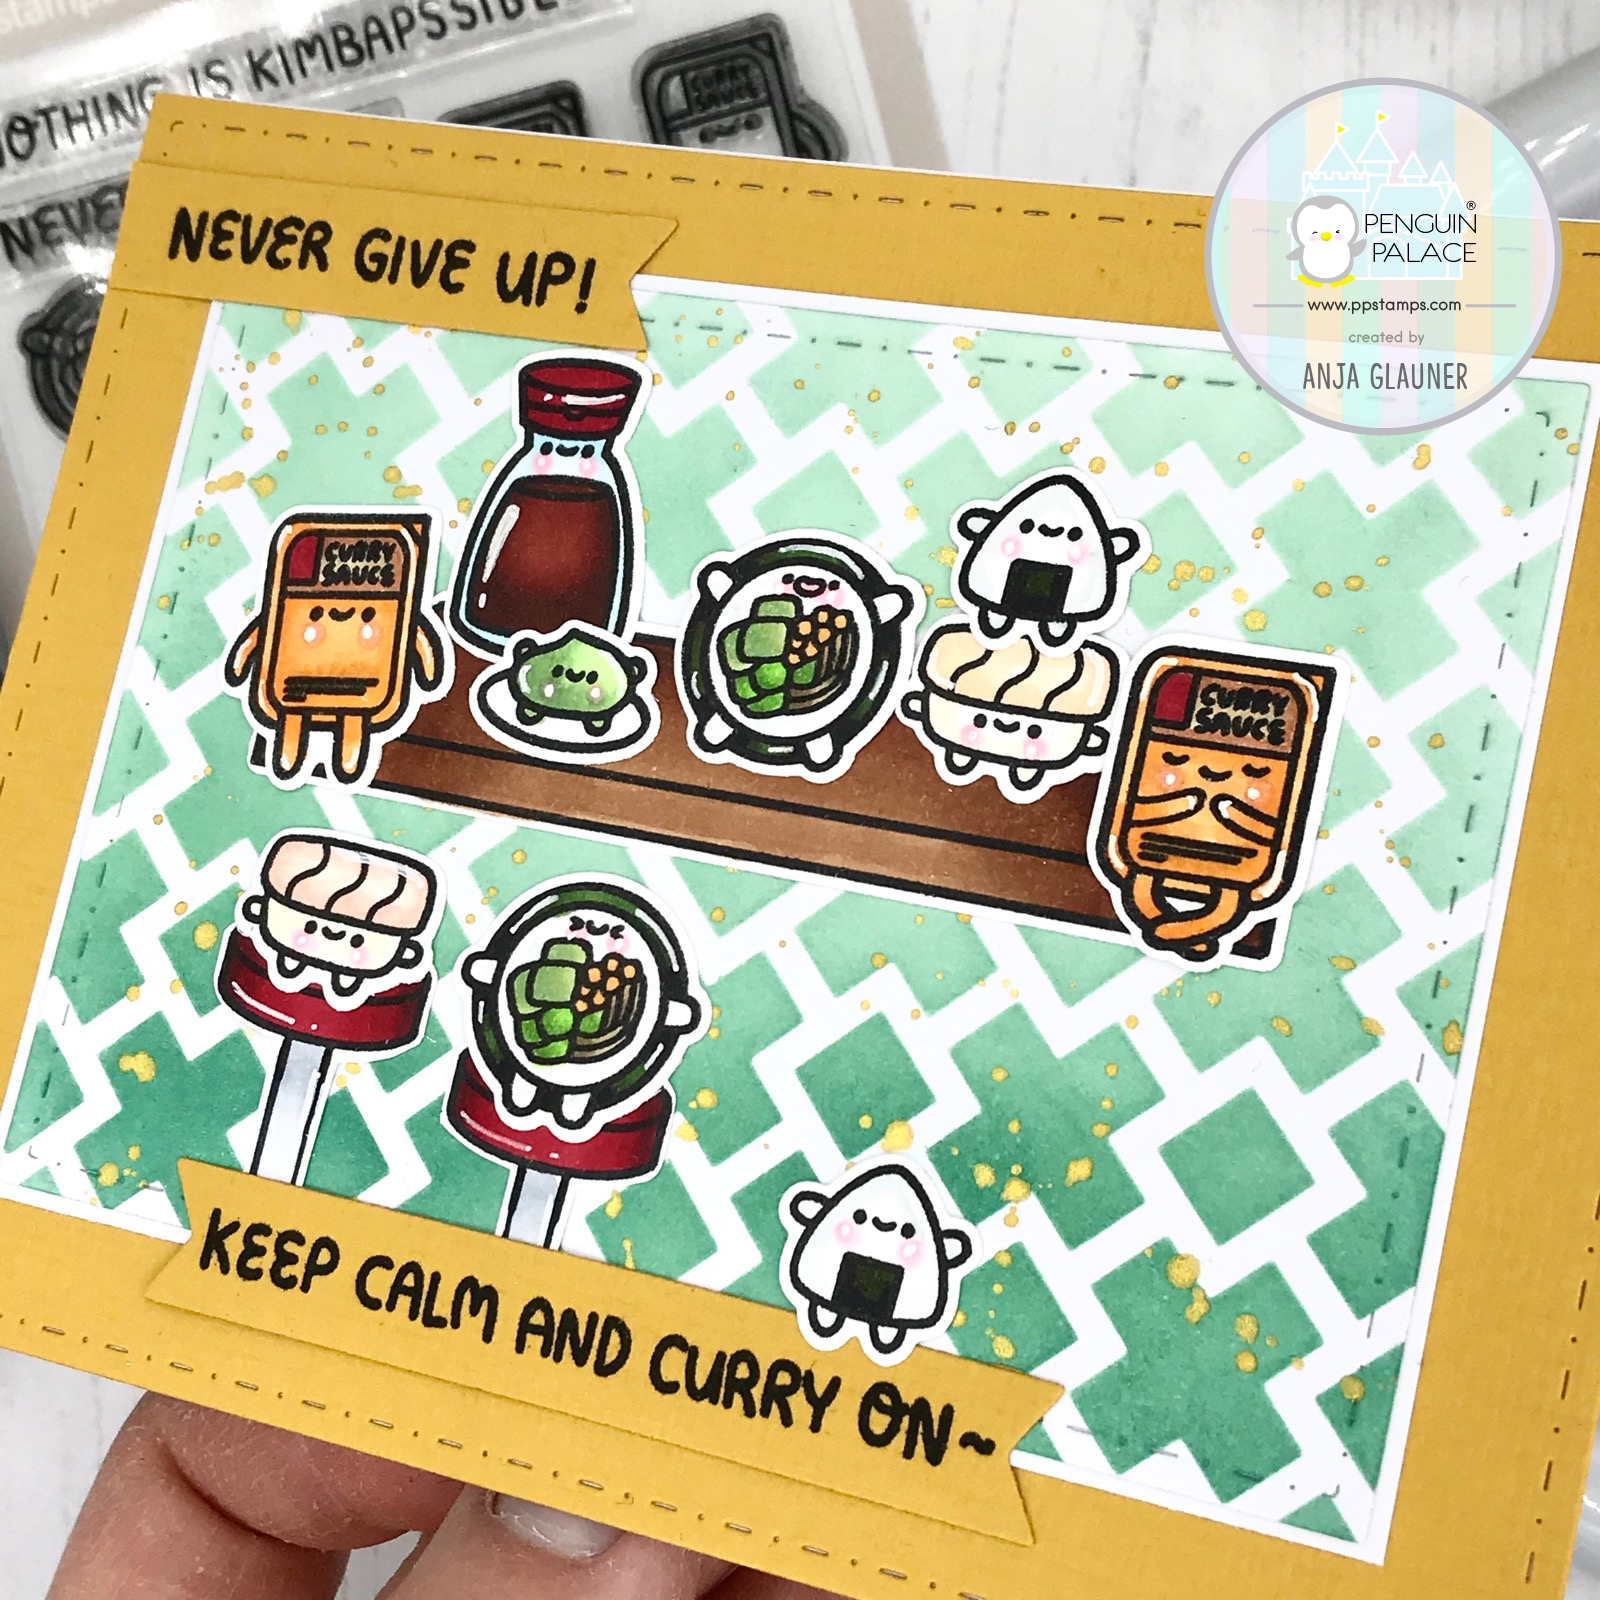
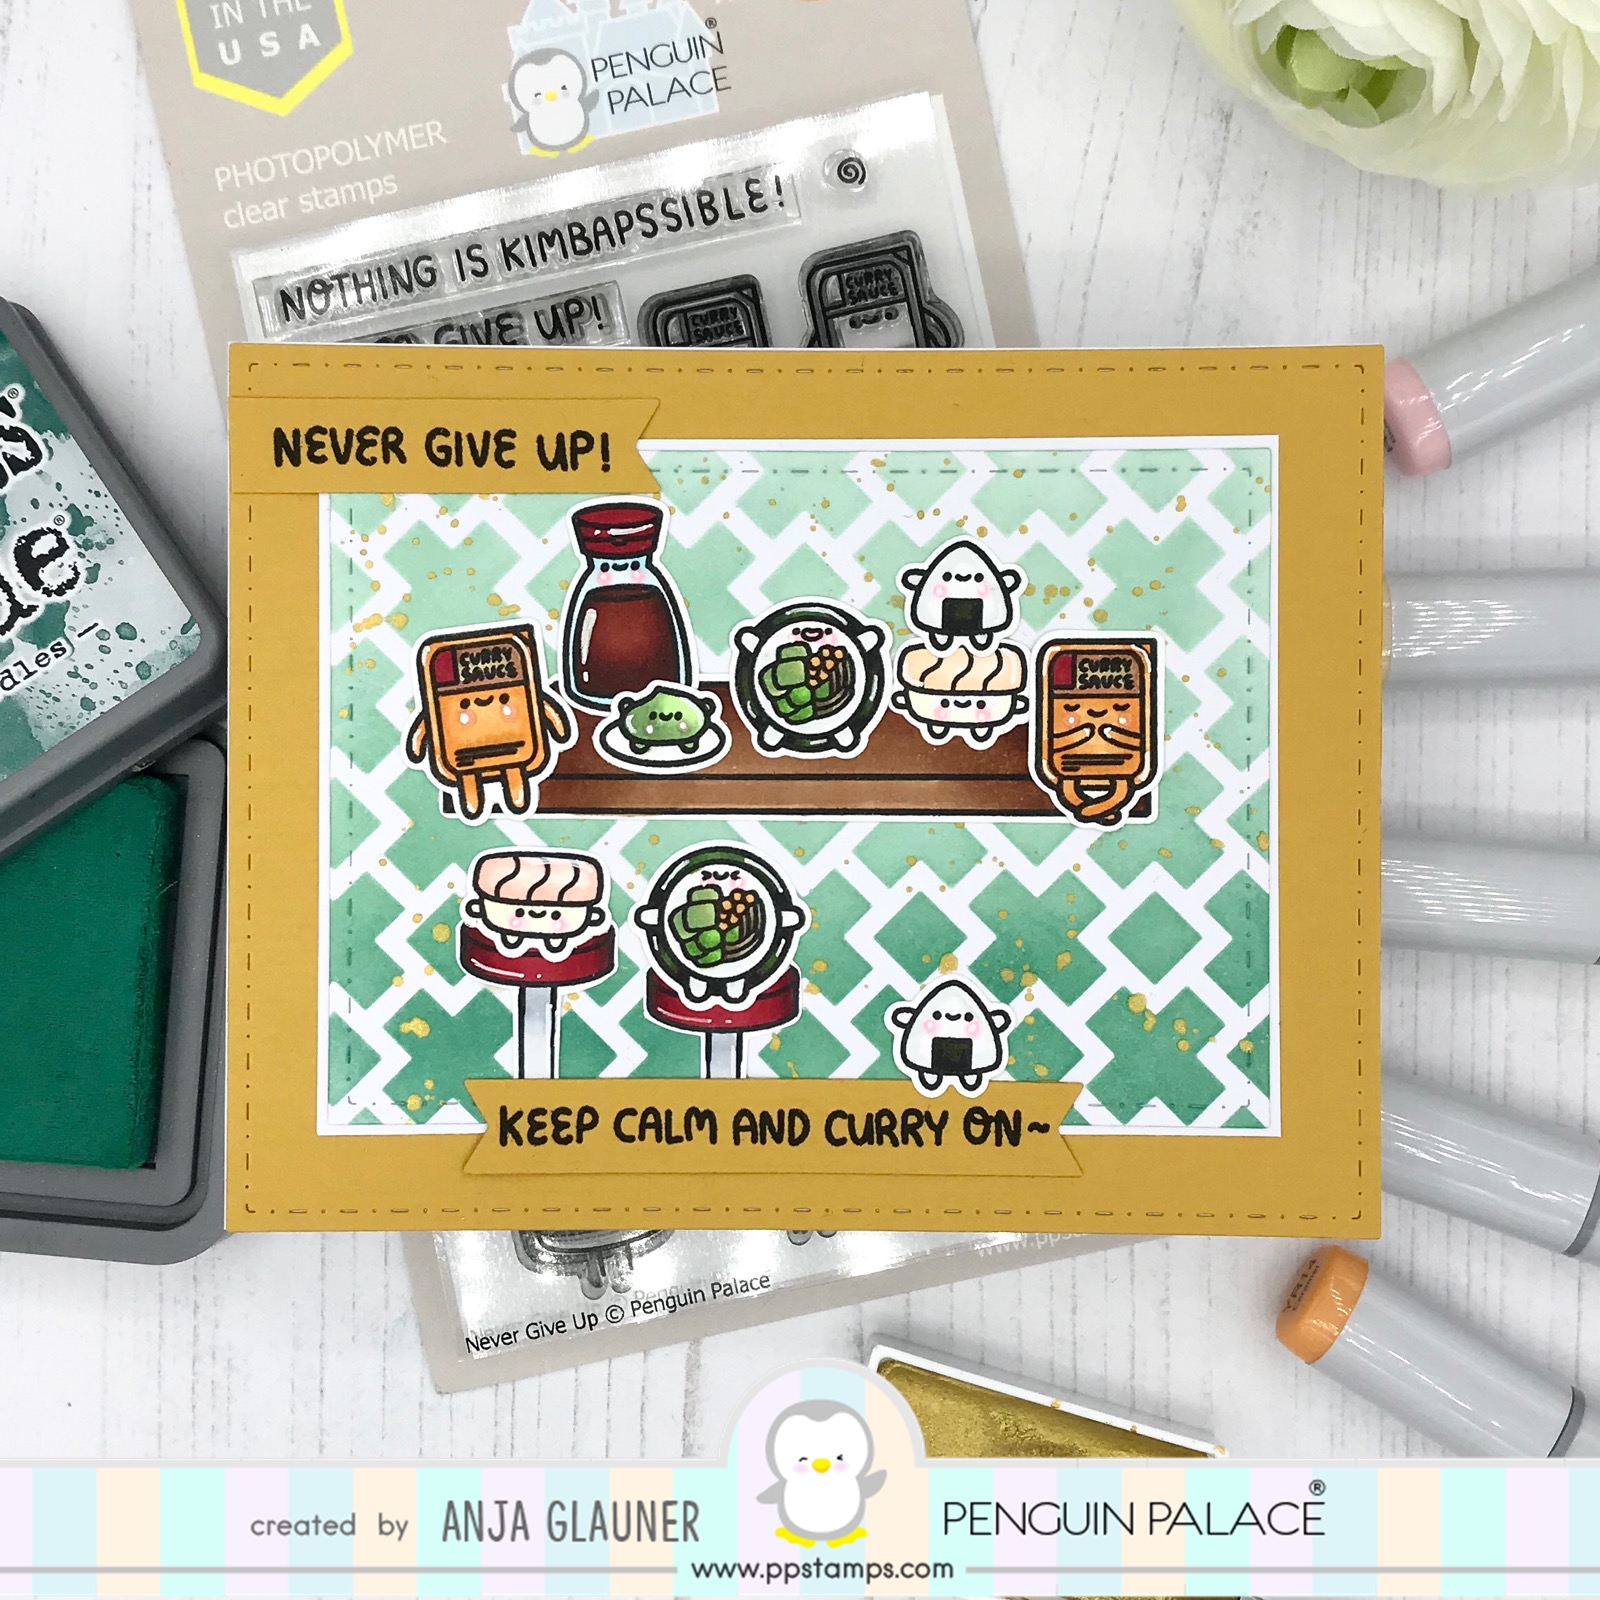
My second card is featuring the new "Never Give Up" stamps and dies and this set includes kawaii sushi! That's so much fun! I love the cute faces and that the sushi has arms and legs, so funny!


I stamped the images and colored them in with my Copics. Then I die cut them with the coordinating Penguin Perfect Cuts.

I made 3 layers for my card. For 2 layers I used new dies which we'll introduce later this week. You will love them! For one layer I chose a cardstock which has a color like curry! I chose it because there are curry themed images and a sentiment. With the smaller die I die cut white cardstock. Next, I ink blended pine needles Distress Oxide ink over the Vintage Basket stencil to create my background and splattered some golden watercolor over the top.


I created my little scene and adhered the images with liquid glue. Next, I die cut 2 banners and stamped my sentiments with Versafine ink.


To finish off, I added white highlights with a gel pen.


I had so much fun creating these cards and I hope you like them!

Be sure to check the Penguin Palace blog to see the projects of the other DT members too!

We will see you tomorrow with another new products of this new release!

Thanks for stopping by and happy crafting!

Anja
If you like this post, be sure to follow my blog! (Buttons are in the sidebar on the right.) 
Freitag, 21. Februar 2020
- Werbung - 
Hi, everyone!

Today I'm sharing this new card I made using the Fun Night Out stamps and coordinating Penguin Perfect Cuts from Penguin Palace. I also used Cross Stitched and Dots Small Rectangle Overlay Dies, Cross Stitched and Dots Large Rectangle Overlay Dies, Home Sweet Home Die and Cyber Wallpaper stencil.


I started by stamping out the cute images and colored them in with my Spectrum Noir Illustrator. I die cut them with the coordinating Penguin Perfect Cuts and added highlights with a white gel pen.

Next, I cut white cardstock to size for my card base and the card panel. Then I used the rectangle overlay dies to die cut a frame. I had the idea that my scene should represent a disco from inside. Therefore I die cut a background with the Home Sweet Home die.


Then, I did some ink blending. For the background which you can see through the windows I ink blended chipped saphire Distress Ink and splattered gold ink for the stars over it. For the wall inside the disco I ink blended victorian velvet Distress Oxide Ink over the Cyber Wallpaper stencil. I chose tumbled glass Distress Ink for the floor.


Next, I stamped the sentiment with VersaMark and embossed ith with white embossing powder on dark blue cardstock.


To finish off, I assembled my card. I adhered my images with foam tape and liquid glue to create dimension.

I hope you like my card! Thanks for stopping by and happy crafting!

Anja
If you like this post, be sure to follow my blog! (Buttons are in the sidebar on the right.) 

@stampinanja

Latest Pins